Materials/tools used
Kit: 1/72 scale Revell S-100 Schnellboot & Flak 38 (05002)
Paint: Testors enamels, Future polish, Alclad Matt Coat.
Decals: Kit supplied
Diorama Base: Picture frame (inverted)
Water: Castin' Craft Polyester Resin
Waves: Liqitex Heavy Gloss Gel
Figures: Revell 1/72 scale German Navy Crew (02525)
Process
1. Build and painted the model
2. Cut off the hull center-line, propellers and rudders.
3. Painted the underneath of the picture frame base
4. Seal all sides of the frame with tape.
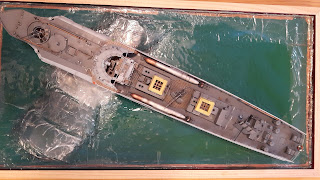
5. Made the wave shapes and attached to glass base (picture frame)
6. Attached the E-Boat to the base.
7. Mix and pour resin.
8. Build and paint waves.
9. Paint and add figures
I first painted the glass of the picture frame underneath with Acrylic paints. Polyester resin does not react well with acrylic paints and changes the colour.
Making the Waves
I made the shape of a wave from clear plastic sheet curved and taped down to the glass. 1.5 litre water bottles can also be used for this
The E-Boat is sailing through the wave at an angle.
The bow waves were made from clear plastic (from a food carton) and cut to shape then bent in a curve and taped to the glass base.
Polyester resin was then poured into the frame (make sure that the edges are taped otherwise the resin will leak). I used 1.5 small tins (each tin is 470ml approximately) to cover the area about 1-1.5cm. I did this is 2 pours and left each one to dry/ cure outside on a warm day (in the shade). I used blue and green food dye to tint the resin into a water colour.
I then put the model under a box to keep the dust off (and bugs/ flies etc) while it was drying.
Creating the Water Texture
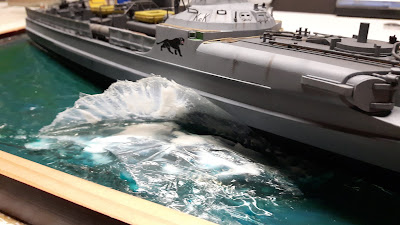
I wanted to capture the effect of the water spray from the E-Boat bow wave as seen above.
After a week, the resin hard dried "click hard" (meaning it clicks when you tap or hit it) and was ready for the waves. Unfortunately I was not careful when using clear tape to seal the frame and the wrinkles can be seen through the resin.
I used Liquitex acrylic gloss gel (medium or heavy will work) and put over the waves with a flat brush and a painting spatula.
For each bow wave, I painted the gel on in brush strokes moving in the direction of the water spray to give the right effect.
The gel will dry clear and be ready for another coat in a few days. The challenge with acrylic gel, is to avoid the small 'spikes' of gel that stick up and make the water look unrealistic.
Adding White Water Foam/ Spray Effect
After the initial gel layer for the waves has dried, I mixed a drop of gel (about 1 cm x 1 cm) with 1 (one) tiny drop of white acrylic artist paint. If you add too much white paint, the mixture will not be translucent enough to look like realistic water/ foam.
S-100 Crew Figures
Next came the task of the figures to make the diorama look more 'populated'. Although most figures make a model look unrealistic (unless you are an expect painter, which I am not) I decided to use them and bought a set of Revell German Navy 1/72 figures (set # 02525)
I find the Airfix and Revell figures hard to work with as they are usually molded in a softer plastic which cannot be sanded easily. Better figures made from pewter can be bought from Hecker & Goros for about $15-20 per set of 3 or 4 figures. The surface of the Revll ones are very greasy and hard for paint to stick to so I painted with a coat of enamel (Modelmaster RLM 70) and then applied a matte coat to seal the paint and avoid chipping marks.
Forward 20mm gunner
S-100 Kapitan
Nice woolly hat sailor!
37mm gun crew
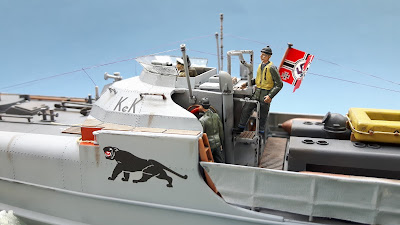
Finished S-100 Schnellboot
The final finished model with figures positioned on the deck.
Please watch the finished S-100 Schnellboot Video below


